Troubleshooting Flowchart
If the printer is not responding properly, use the flowchart to
determine the problem. If the printer does not pass a step, follow
the corresponding troubleshooting suggestions.
If you cannot resolve the problem after following the suggestions in
this user’s guide, contact an HP-authorized service or support
provider. (See the telephone support flyer included with the printer.)
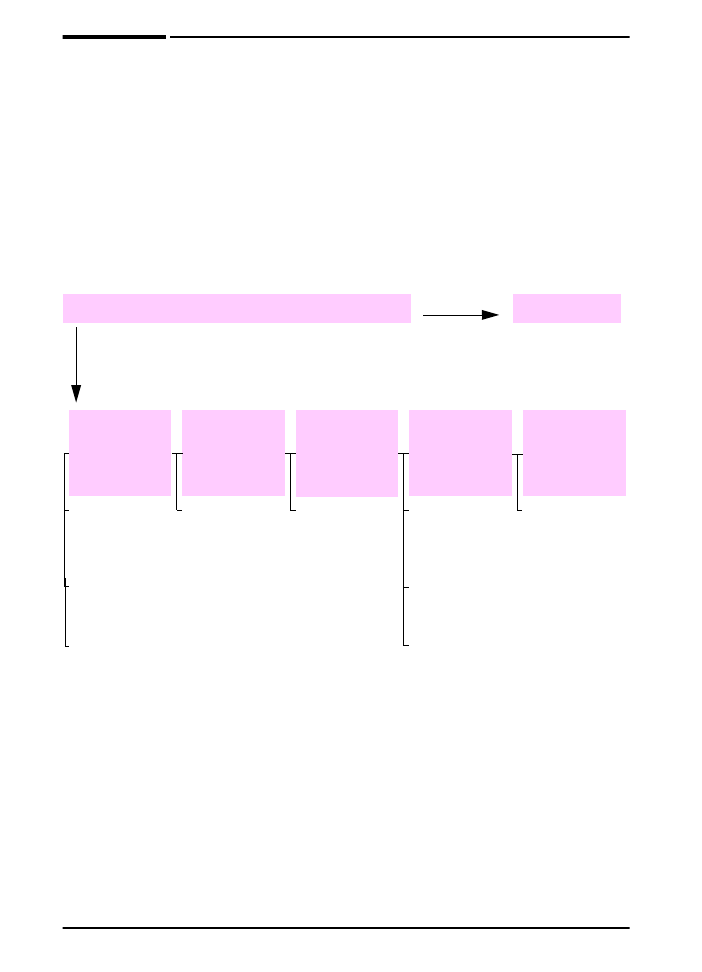
1
Does the control panel display READY?
Go to step
2
.
YES
NO
The display is
blank and the
printer’s fan is
off.
The display is
blank but the
printer’s fan is
on.
The display is
in the wrong
language.
The display
shows garbled
or unfamiliar
characters.
A message
other than
READY
is
displayed.
Check the power
cord connections
and the power
switch.
Press any control
panel key to see
if the printer
responds. Turn
the printer off,
and then turn the
printer on. If this
does not work,
contact an
HP-authorized
service or
support provider.
(See the
telephone
support flyer
included with the
printer.)
Plug the printer
into a different
outlet.
Check that the
power supplied to
the printer is
steady, and
meets printer
specifications
(page A-14).
Turn the printer
off. Hold down
[Select]
while
turning the
printer on. Press
[-Value+]
to
scroll through the
available
languages. Press
[Select]
to save
the desired
language as the
new default.
Press
[Go]
to
return to
READY
.Turn the
printer off and on.
Make sure the
desired language
is selected from
the control panel.
Turn the printer
off, and then turn
the printer on.
Reseat installed
accessories.
Go to page 63.
ENWW
Chapter 4: Problem Solving
73
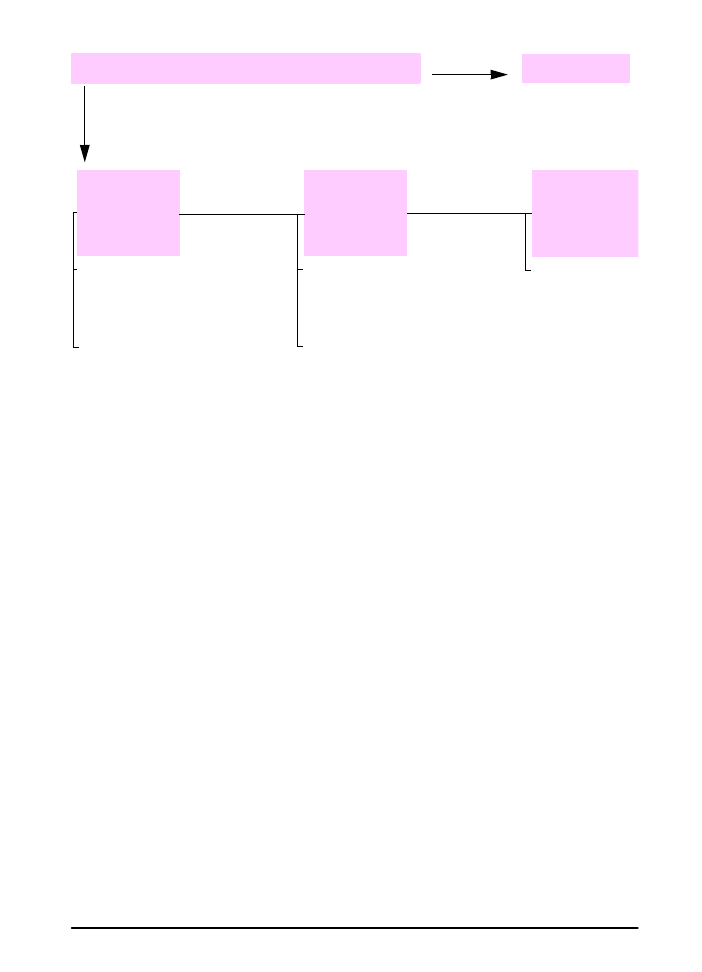
2
Can you print a configuration page?
Go to step
3
.
YES
NO
A
configuration
page does not
print.
A blank
page prints.
A message other
than
READY
or
PRINTING
CONFIGURATION
is displayed.
Go to page 63.
Print a configuration page to verify
that the printer is feeding paper
correctly (page 80).
Check that all trays are properly
loaded, adjusted, and installed in
the printer. (See the sections on
loading paper, starting on page 24.)
From the computer, check the print
queue or print spooler to see if the
printer has been paused. If there
are problems with the current print
job, or if the printer is paused, a
configuration page will not print.
(Press
[Cancel Job]
and try Step 2
again.)
Check that the sealing tape is not still
in the print cartridge. (See the start
guide or the instructions that came
with the print cartridge.)
The print cartridge might be empty.
Install a new print cartridge.

74
Chapter 4: Problem Solving
ENWW
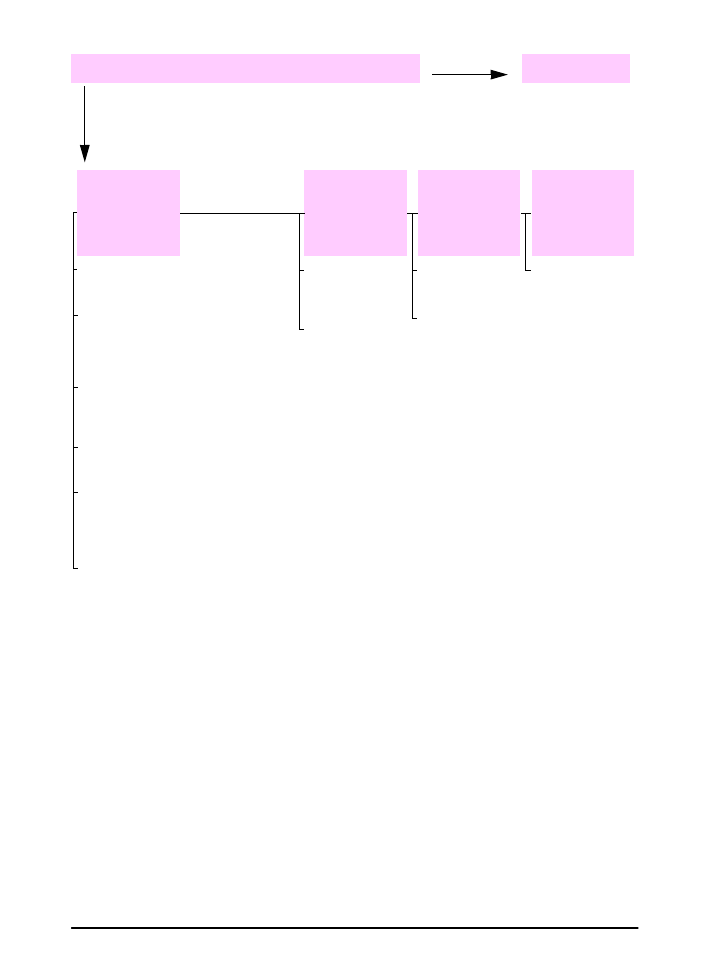
3
Can you print from a software application?
Go to step
4
.
YES
NO
The job will
not print.
A page of
commands
prints.
If the job will not print, and a message is displayed, see page 63.
The printer might
have received
PostScript code.
Print a short document from a software
application.
From the computer, check to see if the printer has been paused.
Check the interface cable connections. Disconnect and reconnect the cable at the
computer and the printer.
Test the cable by trying it on another computer (if possible).
Make sure the cable is IEEE-1284 compliant.
To verify that it is not a computer problem, print from another computer (if possible).
Make sure the print job is being sent to the correct port (LPT1, or network printer
port, for example).
Check that you are using the proper printer driver (page 16).
Reinstall the printer driver. (See the start guide.)
Check that the port is configured and working properly. (One way to check this is to
connect another printer to that port and print.)
From the Configuration Menu in the printer’s control panel, make sure that
PERSONALITY=AUTO
(page B-11).
You might be missing a printer message that could help you solve the problem. From
the Configuration Menu in the printer’s control panel, temporarily turn the Clearable
Warnings and Auto Continue settings off (page B-13) and then print the job again.
ENWW
Chapter 4: Problem Solving
75
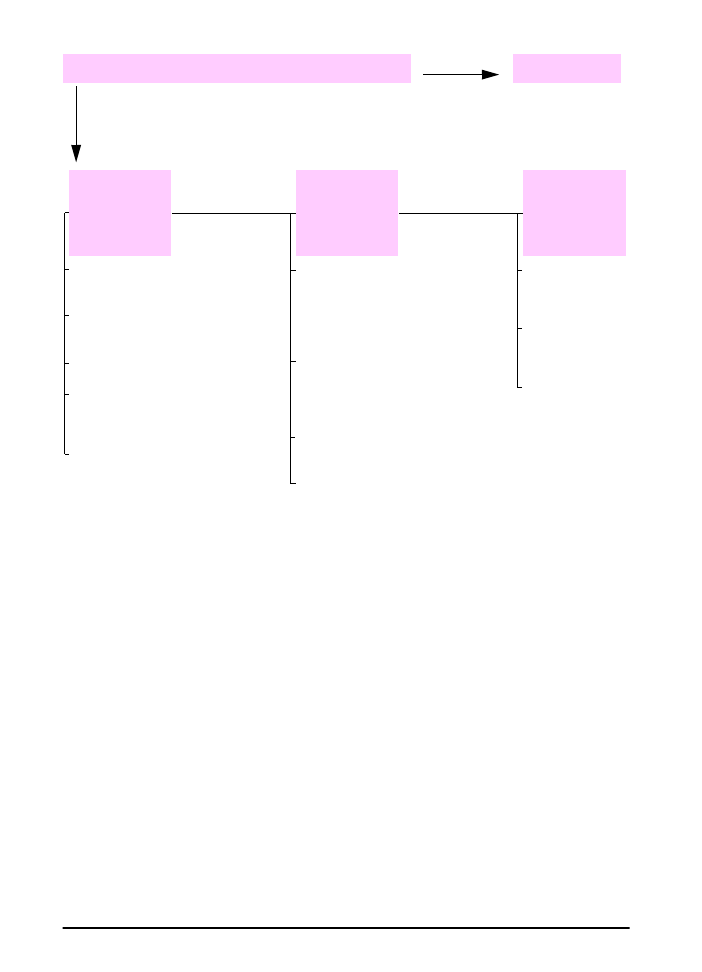
4
Does the job print as expected?
continued
YES
NO
Print is garbled
or only a
portion of the
page prints.
Printing
stops in the
middle of
the job.
Print speed is
slower than
expected.
A control panel
setting is not
taking effect.
Check that you are using the proper
printer driver (page 17).
Check the interface cable
connections. Test the cable by trying
it on another computer (if possible).
Replace the printer cable with a
high-quality cable (page 7).
[Cancel Job]
might have been
pressed.
Simplify the print
job.
Add more
memory to the
printer
(page C-1).
Check settings in
the printer driver
or software
application.
(Printer driver
and software
commands
override control
panel settings.)
Check that the
power supplied to
the printer is
steady, and
meets printer
specifications
(page A-14).
The data file sent to the printer might
be corrupt. To test, try printing it on
another printer (if possible), or try a
different file.
Reduce the job’s complexity, print at
a lower resolution (page B-6), or
install more printer memory
(page C-1).
You might be missing a printer
message that could help you solve
the problem. From the Configuration
Menu in the printer’s control panel,
temporarily turn the Clearable
Warnings and Auto Continue
settings off (page B-13) and then
print the job again.
76
Chapter 4: Problem Solving
ENWW
Does the job print as expected? (continued)
Go to step
5
.
YES
NO
The print
job is not
formatted
correctly.
Pages are
not fed
correctly or are
damaged.
There are
print quality
problems.
Check that you are using the proper
printer driver (page 17).
Try a different font.
Make sure the setting of the dial in
the tray matches the size of the
paper loaded in the tray.
Adjust the print
resolution
(page B-6).
Check the software settings. (See
the software help.)
If
TRAY 1=FIRST
is set in Paper
Handling Menu, the printer pulls
paper from Tray 1, regardless of size.
Make sure paper is loaded correctly
and that the guides are not too tight
or too loose against the paper stack.
(See the sections on loading paper,
starting on page 28.)
If you are trying to print A4 paper, the
side guides in the tray might have
slipped out of place. (Make sure the
side guides are locked into position.)
If you are having problems printing
custom-size paper, see page 40.
If pages are wrinkled or curled, or if
the image is skewed on the page,
see page 71.
Check that REt is
on (page B-6).
Go to page 71.
ENWW
Chapter 4: Problem Solving
77
5
Does the printer select the proper trays and
output locations?
For other
problems,
check the
Contents, the
Index, or
the printer
software help.
YES
NO
The printer
pulls from the
wrong tray.
A message
other than
READY
is
displayed.
Make sure paper trays are correctly
configured for paper size and type
(page 47). Print a configuration page
to see current tray settings
(page 80).
If you do not want to print from Tray 1,
remove any paper loaded in the tray
or change the
TRAY 1 MODE
setting
to
CASSETTE
(page 45). By default,
paper loaded in Tray 1 will be printed
first.
If you want to print from Tray 1, but
cannot select the tray from a
software application, see page 45.
Go to page 63.
Make sure the tray selection (or
paper type) in the printer driver or
software application is set correctly.
(The printer driver and software
application settings override the
printer’s control panel settings.)

78
Chapter 4: Problem Solving
ENWW